A tutorial for installing OpenRazer and Polychromatic
I’ve been slowly building a Linux Mint desk setup in the basement, and this weekend I added an old Razer BlackWidow Lite keyboard and Naga Hex mouse to the mix. As expected, they were plug & play functional out of the box, but the keyboard didn’t have its backlighting enabled. This will simply not do.
Luckily, Razer has pretty good support for Linux with its OpenRazer project.
Installing is pretty simple, but lighting still wasn’t enabled. It took a few minutes of research to figure out that I also needed to install Polychromatic.
So it’s really a 3-step process but still very easy. Here’s how to do it!
Now you can run Polychromatic Controller to enable the lighting effects. I found and launched it by typing “poly” in the system menu.
Source: author
Polychromatic detected both of my peripherals and allowed me to configure them just as I expected.
Source: authorSource: author
Once I selected the static lighting effect and turned up the brightness, the keyboard lit up. Very exciting. Now everything’s working exactly how I hoped and expected!
I’ve been using Linux Mint for just a couple of weeks, and I’ve been very impressed with it. One of my grumbles from previous forays into Linux has been, why is it so hard to add a shortcut to a website?
Like, look at this tutorial for How to Create Desktop Shortcuts on Ubuntu from 2019. The instructions have you installing applications, doing extra steps to customize the icon, and creating .desktop files. It’s a lot.
I don’t know where I got this impression, but I thought WebApp Manager was supposed to be included with Linux Mint. My first hurdle was realizing that it wasn’t and I needed to install it.
You can download and install the beta from the Linux Mint blog article mentioned above. Here’s the download link they provide in the article.
Download and install WebApp Manager, and it becomes accessible from the system menu.
Source: author
Once installed, it’s ultra-intuitive to use. Open it and click to add a new website. When you save, the web app becomes accessible from the system menu like all your other installed applications.
Okay, but can I get an example?
The thing that pushed me into figuring out WebApp Manager is that Amazon doesn’t offer a Kindle reading app for Linux. They do, however, have a cloud reader available at read.amazon.com.
So, let’s see how it looks as a web app in Linux Mint.
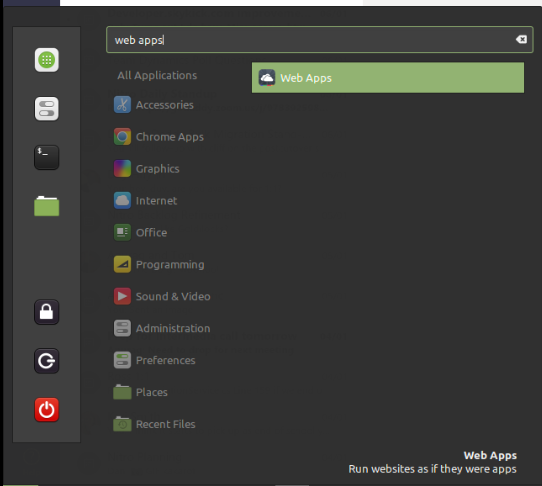
First, we launch WebApp Manager from the system menu, as shown in the screenshot above. Click the “+” icon to add a new app and enter the URL.
Source: author
There are a few cool things to note. First, when you enter the URL, it automatically grabs an icon, but you can also click the icon next to the address box to look for and select other icons. The Amazon smile icon is okay, but I wanted something a little more Kindle-specific.
Source: author
Other options include which category of the system menu to list the web app under and which browser to use. Also noteworthy is the “Isolated profile” option, which is equivalent to running the app in private or incognito mode.
Enter the details, save it, and you’re done. The application now shows in the system menu with the name and icon specified.
Source: author
Launching it opens a satisfying experience that has a very “native app” feel to it. You can pin the icon to your panel for quick access, or right-click it in the system menu to add it to the desktop.
Source: author
Conclusion
In our increasingly web-based world, having access to installable, platform-specific programs becomes less and less critical. It’s one of the reasons Chromebooks are so popular, and Linux benefits from it, too. Linux Mint’s WebApp Manager does a beautiful job of converting websites into an app-like experience.
WebApp Manager is still in beta, and I couldn’t find much information about it after some (very brief) research. It makes a great first impression, though, and it’s another bullet on my growing list of reasons to love Linux Mint.
This article was originally published on Medium on January 7, 2021.
The newest LTS version of Ubuntu is scheduled to release on April 23. Once it’s released, upgrading is as easy as running a few commands. In this article, we’ll walk through the process of updating the current system and then performing the upgrade.
Before you upgrade, make sure your system is as up to date as possible. Do this by running the follwing commands:
If you receive a No new release found message, it means the upgrade hasn’t been made available to you. It’s been noted that the upgrade path from 19.10 will not be enabled until a few days after release, and the upgrade from 18.04 LTS will not be enabled until a few days after the 20.04.1 release expected in late July. However, you can force the upgrade at your own risk by using the -d flag.
I was all geared up to explore unit testing in Angular this morning–something I’ve been putting off learning for quite some time–and quickly hit an problem. I started by installing Angular CLI using apt install ng-common, but trying to use the Angular CLI’s ng command was launching Emacs!
It took me a minute to figure this out, and here’s what it took. First, I uninstalled:
sudo apt remove ng-common
Next, I installed using npm:
sudo npm install -g @angular/cli
This was common how-to-fix-it advice, but this didn’t resolve the problem for me. At this point ng was no longer launching an editor, but instead it was an unrecognized command. Luckily, I found the solution here.
I noticed in the install output that the bin location was listed. I was able to verify where the ng binary was located and add an alias. After that, ng --version worked successfully.
Here’s the alias I added to ~/.bashrc:
alias ng='/usr/local/lib/node_modules/@angular/cli/bin/ng'
In my last article, I wrote about how to create a single-page Angular app using the .NET Core CLI, create a Docker image, and run it as a container in about 4 steps that take just minutes to execute. By modifying a single line in your Dockerfile, you can target the 32-bit ARM architecture needed to run the image as a container on a Raspberry Pi.
Here’s the one line that needs to change in the Dockerfile to make it runnable on ARM32 (old line is commented for reference):
# FROM mcr.microsoft.com/dotnet/core/aspnet:3.1 AS base
FROM mcr.microsoft.com/dotnet/core/aspnet:3.1.2-buster-slim-arm32v7 AS base
WORKDIR /app
EXPOSE 80
EXPOSE 443

FROM mcr.microsoft.com/dotnet/core/sdk:3.1 AS build
WORKDIR /src
COPY ["my-app.csproj", "./"]
RUN dotnet restore "./my-app.csproj"
COPY . .
WORKDIR "/src/."
RUN dotnet build "my-app.csproj" -c Release -o /app/build
RUN apt-get update && \
    apt-get install -y wget && \
    apt-get install -y gnupg2 && \
    wget -qO- https://deb.nodesource.com/setup_10.x | bash - && \
    apt-get install -y build-essential nodejs

FROM build AS publish
RUN dotnet publish "my-app.csproj" -c Release -o /app/publish

FROM base AS final
WORKDIR /app
COPY --from=publish /app/publish .
ENTRYPOINT ["dotnet", "my-app.dll"]
Note that the official list of available tags for different architectures can be found here. Consult this list to determine if newer images are available.
That’s it, though. Create your image, push it to Docker Hub, pull it on your Raspberry Pi, and run it just as you would locally. If you haven’t used Docker Hub before, you’ll need to login and create a repository. Check out the Docker Hub Quickstart for help. You may also need to run docker login on both machines to access your new repo.
# dev machine
docker build -t <dockerID>/repo .
docker push <dockerID>/repo

# raspberry pi
docker pull <dockerID>/repo
docker run -d -p 5000:80 <dockerID>/repo
The default dotnet new Angular app running locally on Raspberry Pi.
In this article, I’ll demonstrate how to create an ASP.NET Core Angular single-page application using the .NET Core CLI, create a Docker image, and run it as a container. The entire process is just 4 steps, each of which takes about a minute to perform–although creating the Docker image takes a couple minutes to complete. Note, also, that these same steps work from both Linux and Windows.
Create Angular application
Create Dockerfile
Create Docker image
Run container
Before you start, make sure you have the following prerequisites installed.
.NET Core SDK
Visual Studio Code with Docker extension
Docker
Installation can be verified by running these commands:
We begin by creating our Angular application using the dotnet new command and specifying the angular template. The -o argument will cause the new project to be created in a sub-folder named my-app. This will create a .NET Core ASP.NET project with an Angular app in its ClientApp folder. After running the command, go into the new directory and launch Visual Studio Code.
dotnet new angular -o my-app
cd my-app
code .
Add Docker Files
With the Docker extension for VS Code installed, you can add Docker files easily via the command palette. Open the command palette using ctrl+shift+P or View > Command Palette menu options, and run the command Docker: Add Docker Files to Workspace. (Tip: type “docker” to filter commands.)
Selecting the command will ask you a series of questions:
Application Platform: ASP.NET Core
Operating System: Linux
What port(s) does your app listen on? 80, 443
If you’re running Docker on Windows, it’s important to make sure Docker is configured to run the right type of containers (Windows vs Linux). I answered “Linux” above, and I can confirm that my Docker for Windows is configured to run Linux containers by clicking the Docker icon in my system tray, as shown in the screenshot below. It shows “Switch to Windows containers” which means it’s currently using Linux containers. It’s fine to use Windows containers, too, but you’ll need to adjust installation instructions for NodeJS in the Dockerfile further down.
Once you’ve answered the Docker extention’s questions, a Dockerfile is generated. One modification is needed to also install NodeJS for our client app. The lines needed to do this are highlighted in the complete Dockerfile below.
FROM mcr.microsoft.com/dotnet/core/aspnet:3.1 AS base
WORKDIR /app
EXPOSE 80
EXPOSE 443

FROM mcr.microsoft.com/dotnet/core/sdk:3.1 AS build
WORKDIR /src
COPY ["my-app.csproj", "./"]
RUN dotnet restore "./my-app.csproj"
COPY . .
WORKDIR "/src/."
RUN dotnet build "my-app.csproj" -c Release -o /app/build
RUN apt-get update && \
    apt-get install -y wget && \
    apt-get install -y gnupg2 && \
    wget -qO- https://deb.nodesource.com/setup_10.x | bash - && \
    apt-get install -y build-essential nodejs

FROM build AS publish
RUN dotnet publish "my-app.csproj" -c Release -o /app/publish

FROM base AS final
WORKDIR /app
COPY --from=publish /app/publish .
ENTRYPOINT ["dotnet", "my-app.dll"]
Build the Image
When you’re done editing your Dockerfile in VS Code, save changes and head back to the command line. Run the following command to build your image:
docker build -t my-app .
Verify that the image was created by running another command:
docker image ls my-app
Run a Container
Now we’ll use the docker run command to run a container using our image. We’ll specify two arguments: -d to run in detached mode and -p to map ports on the local machine to the container.
docker run -d -p 5000:80 my-app
Verify that the app is running by browsing to the localhost:5000:
I have a complicated relationship with Linux. Every few years, I get nostalgic about my Solaris days back in college. So I build a machine, struggle through getting all the hardware & whatnot working, and invest tons of time trying to get the Windows apps I know & love running on it. Then I give up and go back to Windows.
And that’s about where I’m at now, in the nostalgia/fascination stage with fantasies of leaving my familiar Microsoft pastures. At work, we’re moving more & more toward containerization and Kubernetes with the goal of reducing cost by hosting services on Linux. Maybe its relevance to work will give the effort more legs this time?
So I embarked on the journey (again) and have been pleased with how much the experience has matured. Doing a clean install of Ubuntu on my old laptop was completely painless. I didn’t need to do any special setup or troubleshooting to get hardware running. In fact, it was 100% as easy as installing Windows, which I was forced to do a few weeks earlier presumably due to some botched updates that had me blue-screening every few minutes.
Keeping the momentum going, I jumped right into installing .NET Core and setting up Visual Studio Code. The whole thing–from beginning to end; from formatting and installing the OS to running my first console app–took about an hour.
It was easy enough that just about anybody capable of doing a clean OS install should be able to manage it. In fact, let’s go through all the steps, right now! I’ll walk you through what’s needed from installing the OS, .NET Core, and VS Code all the way through to creating and running a new project.
Alternatively, you could use a virtual machine. Since I’m retracing my own steps as I write this, I’m using VirtualBox which is freely available to everybody–so no excuses about not having a spare computer laying around! If you’re going this route, download VirtualBox, fire it up, and create a new virtual machine. For reference, I picked Linux/Ubuntu (64-bit) and used all defaults*. You still need to download the Ubuntu ISO, and select it as the boot media the first time you start the VM.
*My VM kept hanging during install until I increased memory from the default 1024 MB to 2048 MB.
Alright, now we’ve got our Linux machine running, and it’s time to install .NET Core. Follow Microsoft’s instructions to install the .NET Core SDK, or open a terminal and run the following commands:
That’s it! Who’s ready to run some code? Use the dotnet CLI to create a new console app, open the code in VS Code, and run it using F5 or Debug > Start Debugging. (If it’s your first run with the C# extensions installed, you may need to wait while it downloads dependencies.) VS Code will ask you which environment to use; pick .NET Core to add a launch.json file which tells VS Code how to run your app.
dotnet new console -o HelloConsole
cd HelloConsole
code .
And there you have it. Reproducing the setup on a VM, I was able to download the Ubuntu ISO, create a clean install, install .NET Core SDK & runtime along with VS Code, and create & run a new C# console app in under an hour. Not bad!